La pagina descrive la configurazione di una casella Microsoft tramite accesso OAuth2
1. Register the sample with your Azure Active Directory tenant
Per consentire a MSA di accedere ad una casella Microsoft usando OAuth2 e IMAP occorre prima di tutto creare un'applicazione nel tenant della casella su Microsoft Azure.
For more information on how to get an Azure AD tenant, see How to get an Azure AD tenant
To register the project, you can follow the steps in the paragraphs below:
Choose the Azure AD tenant where you want to create your applications
As a first step you'll need to:
- Sign in to the Azure portal using either a work or school account or a personal Microsoft account.
- If your account is present in more than one Azure AD tenant, select your profile at the top right corner in the menu on top of the page, and then switch directory. Change your portal session to the desired Azure AD tenant.
- In the portal menu, select the Azure Active Directory service, and then select App registrations.
In the next steps, you might need the tenant name (or directory name) or the tenant ID (or directory ID). These are presented in the Properties of the Azure Active Directory window respectively as Name and Directory ID
Register the client app (iwa-console)
Navigate to the Microsoft identity platform for developers App registrations page.
Select New registration.
- In the Name section, enter a meaningful application name that will be displayed to users of the app
- Click Register button at the bottom to create the application.
On the application Overview page, find the Application (client) ID and Directory (tenant) ID values and record it for later. You'll need it to configure the configuration file(s) later in your code.
In the list of pages for the app, select API permissions
- Click the Add a permission button and then,
- Ensure that the Microsoft APIs tab is selected
- In the Commonly used Microsoft APIs section, click on Microsoft Graph
- In the Delegated permissions section, ensure that the right permissions are checked: User.Read, User.ReadBasic.All. Use the search box if necessary.
- Select the Add permissions button
At this stage permissions are assigned correctly but the client app does not allow interaction. Therefore no consent can be presented via a UI and accepted to use the service app. Click the Grant/revoke admin consent for {tenant} button, and then select Yes when you are asked if you want to grant consent for the requested permissions for all account in the tenant. You need to be an Azure AD tenant admin to do this.
Link alternativo per la registrazione dell'app
https://learn.microsoft.com/en-us/azure/active-directory/develop/quickstart-register-app
NOTE: in fase di registrazione, copiarsi il secret ID altrimenti cambiando pagina, si perde.
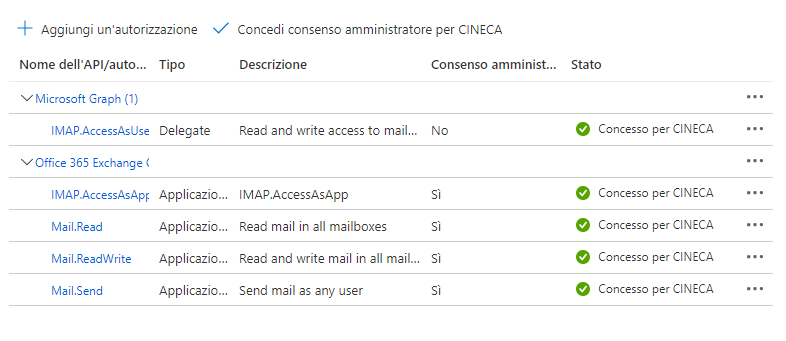
Il punto 5 i passi seguiti sono: in "App Usate Dalla Organizzazione" ->
cercare "Office 365 Exchange OnLine"
nelle "Autorizzazione Applicazione"
→ nella voce "Mail" selezionare:
Mail.Read
Mail.ReadWrite
Mail.Send
cercare: "Microsoft Graph" e selezionare:
Imap.AccessAsUser.All
Per convalidare il tutto, selezionare "Concedi Consenso Autorizzazione <Azienda>" in modo poi da avere i relativi check verdi, come nell'esempio sotto:
Per associare la casella alla applicazione eseguire da console Exchange On Cloud, i due comandi : New-ServicePrincipal e Add-MailboxPermission
New-ServicePrincipal -AppId <APPLICATION_ID> -ServiceId <OBJECT_ID>
dove AppID è (lo vedi in panoramica nell'app)
ID applicazione (client)
OBJECT_ID sarebbe ID oggetto
( per una verifica: Get-ServicePrincipal | FL)
Add-MailboxPermission -Identity <casella> -User <id object applicazione> -AccessRights FullAccess
2. Disabilitare l'autenticazione a più fattori sulla casella di posta
La procedura di richiesta del token di accesso (OAuth2) impone che venga disabilitata l'autenticazione a più fattori (2FA) sulla casella da leggere.
Su Azure è possibile configurare il tenant per consentire ad un gruppo di non usare la 2FA, inserendo nel gruppo la casella di posta.
3. Impostazione del permesso IMAP.AccessAsUser.All
Affinché l'applicazione creata in Azure possa operare nella casella di posta è necessario impostare il permesso IMAP.AccessAsUser.All presente in Microsoft Graph:

For IMAP the only permission you need is https://outlook.office.com/IMAP.AccessAsUser.All (you'll find the permission themselves under the Graph API) and the registration needs to be done in the Azure Portal https://docs.microsoft.com/en-us/azure/active-directory/develop/quickstart-register-app to allow the ROPC flow you need to set the application registration to allow public flows
4. Dati necessari per la configurazione di MSA
Per poter accedere alla casella di posta MSA ha bisogno dei seguenti dati:
- Indirizzo della casella di posta.
- Login per accedere alla casella.
- Password per accedere alla casella.
- Host e porta del server di posta (normalmente è: outlook.office365.com:993).
- Tenant ID.
- Client ID.
- Client Secret.
I dati 1, 2, 3, 5, 6 e 7 devono essere forniti dal cliente.
Queste informazioni vanno poi inserite nella scheda AOO in cui va configurata la casella.
Suggerimento
Per verificare se la richiesta del token di accesso va a buon fine senza aspettare MSA, si può effettuare una chiamata http POST con questi parametri (si può usare Postman o curl):
URL da invocare:
https://login.microsoftonline.com/<Tenant ID>/oauth2/v2.0/token
Parametri:
	client_id=<CLIENT ID>
	client_secret=<CLIENT SECRET>
	grant_type=password
	scope=https://outlook.office365.com/.default
	username=<LOGIN>
	password=<PASSWORD>
Se tutto va bene, la risposta ha la seguente struttura:
{
    "token_type": "Bearer",
    "scope": "https://outlook.office365.com/IMAP.AccessAsUser.All https://outlook.office365.com/User.Read https://outlook.office365.com/.default",
    "expires_in": 5177,
    "ext_expires_in": 5177,
    "access_token": "eyJ0eXAiOiJK..."
}
5. Configurazione della casella nella scheda AOO
I dati del par. 4 vanno inseriti nella casella di archiviazione definita nella scheda AOO:
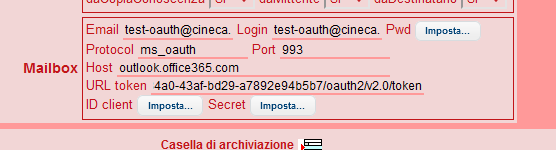
Note
- 'Protocol' deve essere ms_oauth
- 'URL token' ha la seguente struttura: https://login.microsoftonline.com/<Tenant ID>/oauth2/v2.0/token
Va composto manualmente sostituendo <Tenant ID> con l'id dato dal cliente.