IMPORTANT: users with Ubuntu operating systems (but may happen also for other Linux distributions) should not run the command "sudo apt install step" because this will install a different software that will give errors when following the below instructions.
Configuration of the step client
To configure smallstep on your Linux system, you should run the following command in your local shell:
$ step ca bootstrap --ca-url=https://sshproxy.hpc.cineca.it --fingerprint 2ae1543202304d3f434bdc1a2c92eff2cd2b02110206ef06317e70c1c1735ecd
The root certificate has been saved in <path-to>/.step/certs/root_ca.crt.
The authority configuration has been saved in <path-to>/.step/config/defaults.json.
ATTENTION: if you have a previous version of smallstep installed and configured on your system, the client will ask if you want to overwrite the existing configuration. To save a copy of a previous version of smallstep installed and configured on your system, make a copy of the directory .step.
Activation of the ssh-agent
To use the certificate, the user should activate the ssh-agent running:
$ eval $(ssh-agent)
Notice: if the agent is already activated, this step is not necessary. If you observe anomalous behaviours, try if jumping this step solves the issue.
At this point, to obtain the certificate run:
$ step ssh login '<user-email>' --provisioner cineca-hpc
the command will report on the shell an output like the following one:
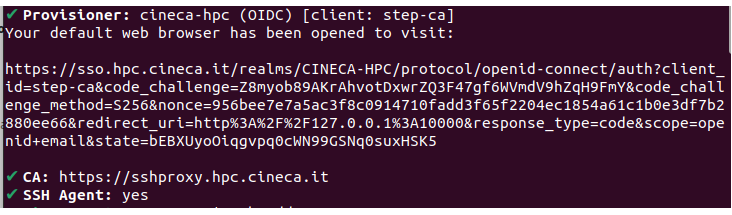
Then the following page on keycloack will open automatically on the browser. The user has to put his/her cluster credentials (username and password) and push the button "Sign in". Then, keycloak will ask for the OTP code generated by the Authenticator (see Configure the OTP).


Once authenticated, you will see a Success message on your browser meaning that the certificate has been generated and it is available on your PC.
IMPORTANT: the temporary certificate is valid for 12 hours. If you reboot your PC the certificate is lost and you need to download a new one launching again the "step ssh login ..." command.
It is possible to check for the presence of a valid certificate both via ssh-agent and the step command as follow:
$ ssh-add -L
ecdsa-sha2-nistp256-cert-v01@openssh.com AAAAKGVjZHNhLXNoYTItbmlzdHAyNTYtY2VydC12MDFAb3BlbnNzaC5jb20AAAAgYjJfSnpeTTNrMHB4Lm9yX3YjZWNxXyRxcHM9blRzU1gAAAAIbmlzdHAyNTYAAABBBAJRZ11/PIo0VJknlFMDa5BIaJp/w0OWd95ueZbWlQ4uG92aSZ+K8aKgkyDiOGla3x7l+saVT/pIR+x3zBgvwgkLrbmYufPPVAAAAA
EAAAAUbS5tb3Jnb3R0aUBjaW5lY2EuaXQAAAAMAAAACG1tb3Jnb3R0AAAAAGILhpwAAAAAYgv3HAAAAAAAAACCAAAAFXBlcm1pdC1YMTEtZm9yd2FyZGluZwAAAAAAAAAXcGVybWl0LWFnZW50LWZvcndhcmRpbmcAAAAAAAAAFnBlcm1pdC1wb3J0LWZvcndhcmRpbmcAAAAAAAAACnBlcm1pdC1wdHkAAAAAAAAADnBlcm1pdC11c2VyLXJjAAAAAAAAAAAAAABoA
AAAE2VjZHNhLXNoYTItbmlzdHAyNTYAAAAIbmlzdHAyNTYAAABBBAE3K7f5piMLWXDm9c6kd+VAJmBClKXkQ9i/8E1UA9DcBFofX+r9JyBOULZSDkGtr84oqpNX0fa5DMCar3AQp1YAAABkAAAAE2VjZHNhLXNoYTItbmlzdHAyNTYAAABJAAAAIDg33ohPQ6BgzV1ATGsSVSbRwrbYa8LprV2EEHk4mMgWAAAAIQCkd8QKYS+zbeyD1nXeuRAXVWJXJeoxMScgDVx2
qqu2Mg== <user-email>
$ step ssh list
256 SHA256:x+QEW8xmDBtRjVRtAukc7v7zKEHef/9joyFP9n/gZtk <user_email> (ECDSA-CERT)
To examine the validity of the certificate run:
$ step ssh list --raw '<user_email>' | step ssh inspect
-:
Type: ecdsa-sha2-nistp256-cert-v01@openssh.com user certificate
Public key: ECDSA-CERT SHA256:TdhIpD5KFZD37roGYcDstS7180TruOnNgNJeS8eJJPk
Signing CA: ECDSA SHA256:e0ZF6AnnUzi0g7Db9nOaXxkEjRq9D6Ka4tV04XqiIgM
Key ID: "<user_email>"
Serial: 841532770994081620
Valid: from 2022-02-15T11:55:24 to 2022-02-15T19:55:24
Principals:
<username>
Critical Options: (none)
Extensions:
permit-X11-forwarding
permit-port-forwarding
permit-pty
An alternative mode of creation of the step certificate
If it is necessary to avoid using ssh-sgent you can download your certificate launching the following command in any path of your local PC (we suggest in ~/.ssh folder):
You can change my_key with the name you prefer.
A password to encrypt the private key is requested on the shell command line
Please, choose a password and memorize it. It will be requested at login.
Three keys will be generated in the path where you executed the above command.
To use the keys to access the cluster you can place the three files in the ~/.ssh folder, or you have to specify -i <path-to-keys> and enter as passphrase the password selected in the previous step:
$ ssh -i /path/my_key <username>@login.<cluster>.cineca.it
"Enter passphrase for key 'my_key"
Remember that also these keys have an availability of 12 hours.