In this page:
Introduction
A X.509 certificate is issued by a Certificate Authority (CA) which checks the identity of the user and guarantees that the holder of this certificate is existing and his certificate is valid.
The certificate is used for authentication instead of the user's account to avoid the replication of the user's account. When authenticating to a site, the user's certificate is mapped to a local account under which all commands are executed.
In the following, the application procedure for a x509 certificate and the generation of a proxy is described. The application has to be done once followed by the installation of the certificate in the home directory of the user's account. The proxy generation has to be repeated every time no valid proxy exists on the user's submission machine.
How to get your X.509 certificate
User who needs a X.509 certificate can go to https://cert-manager.com/customer/garr/idp/clientgeant, choose his institution and login using the credential provided by his Identity Provider.
Then select " GÉANT Personal Authentication" as Certificate Profile , "395 days" as Term, "Key Generation" as Enrollment Method, and "RSA - 2048" as Key Type. At the end, add the password to encrypt the certificate.
If your affiliation is not in the IDP list, please ask your company to be added to the IDP list.
For industrial users, send an email to superc@cineca.it and we will provide a X.509 certificate to use on CINECA HPC machines.
How to extract the SubjectDN of a x509 certificate
To extract the Subject DN of your certificate, open a browser in which your x509 certificate is imported and look at the details of your certificate.
As an example, for Firefox browser, follow the steps:
- Click on Preferences --> Privacy & Security --> View Certificates
- Select the certificate, click on it, then click on the "View" tab
- Click on the "Details" tab
- In the "Certificate Fields" panel, look for "Subject", click on it and in the panel "Field Value" will appear the subject DN.
To write it in the UserDB please note :
- follow the same order shown in the browser
- add a comma among the fields of the subject (don't add blank space between comma and fields)
- in each field, remove the blank space after and before the "=" symbol
- the string is case sensitive
As an example, in the picture below is what shown in Firefox Browser
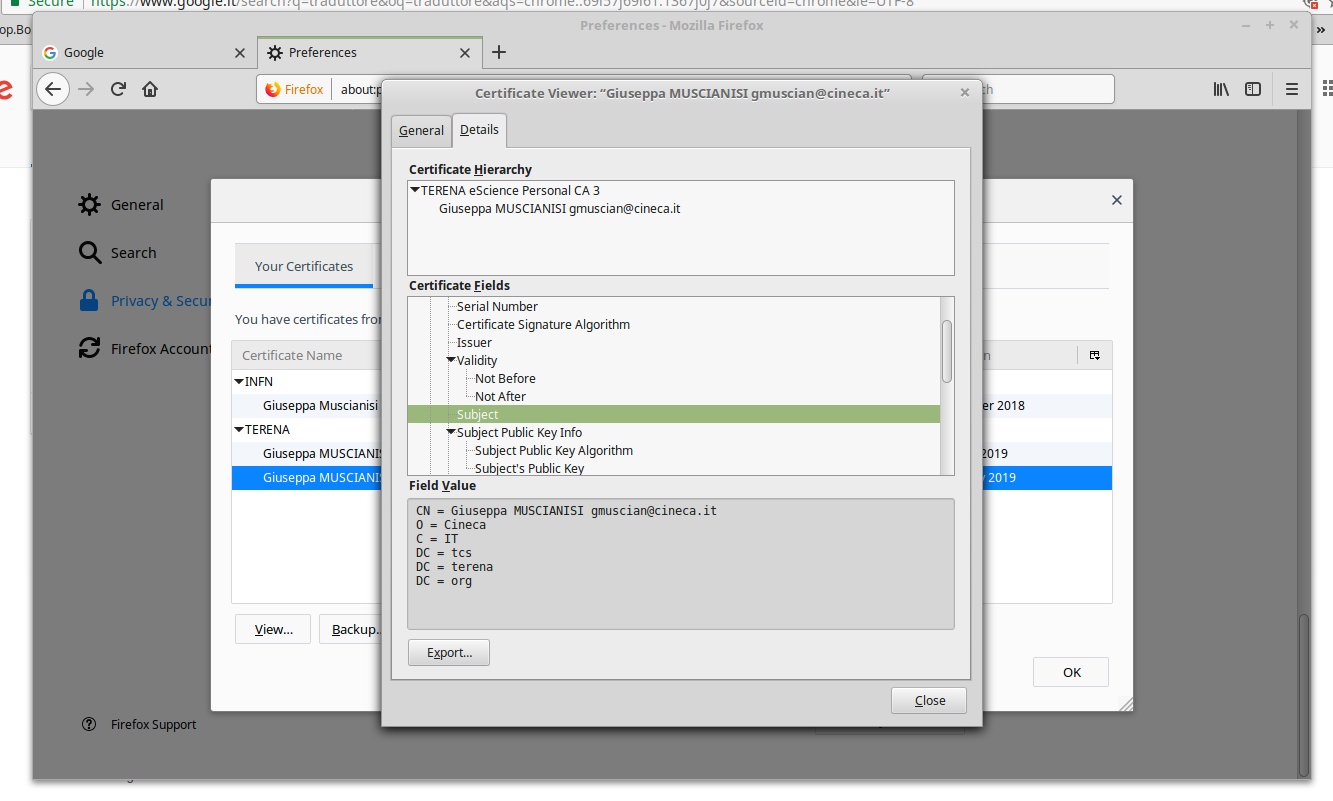
So, in UserDB https://userdb.hpc.cineca.it, it have to be written as:
CN=Giuseppa MUSCIANISI gmuscian@cineca.it,O=Cineca,C=IT,DC=tcs,DC=terena,DC=org
For PRACE users, provide to the User Support (superc@cineca.it) the subjectDN in the same way.
Installation of the X.509 certificate
After the successful application, the certificate has to be installed in your home directory following these instructions:
Export or 'backup' the certificate from the browser used for the application. The interface for this varies from browser to browser. The exported file will probably have the extension .p12 or .pfx. Guard this file carefully. Store it off your computer, or remove it once you are finished with this process.
Copy the file to your home directory.
Create a directory in your $HOME directory:
user$ mkdir $HOME/.globus
No valid Data Center license found
Please go to Atlassian Marketplace to purchase or evaluate Refined Toolkit for Confluence Data Center.
Please read this document to get more information about the newly released Data Center version.Extract the certificate creating a public and private key file replacing Yourcert.p12 with the filename chosen during step 1 and give the right permissions to the files:
user$ openssl pkcs12 -clcerts -nokeys -in cert.p12 -out $HOME/.globus/usercert.pem
Enter Import Password: <password used for backup of your .p12 certificate>
MAC verified OK
user$ openssl pkcs12 -nocerts -in cert.p12 -out $HOME/.globus/userkey.pem
Enter Import Password: <password used for backup of your .p12 certificate>
MAC verified OK
Enter PEM pass phrase: <password to encrypt your private key>
Verifying - Enter PEM pass phrase <password to encrypt your private key>
user$ chmod 644 $HOME/.globus/usercert.pem
user$ chmod 400 $HOME/.globus/userkey.pem
No valid Data Center license found
Please go to Atlassian Marketplace to purchase or evaluate Refined Toolkit for Confluence Data Center.
Please read this document to get more information about the newly released Data Center version.You will be asked to define a passphrase during this step. This passphrase has to be entered every time a proxy is created from the certificate. For security reasons, an empty passphrase is not adviseable.
To use your certificate on CINECA machines, extract your own user DN (Distinguished Name) from the certificate and add it to your userdb profile (https://userdb.hpc.cineca.it/) under the "personal data" section in the field X.509 certificate, following the specified syntax. You can extract your DN for example typing
user$ openssl x509 -in $HOME/.globus/usercert.pem -noout -subject | sed 's/subject= //'
No valid Data Center license found
Please go to Atlassian Marketplace to purchase or evaluate Refined Toolkit for Confluence Data Center.
Please read this document to get more information about the newly released Data Center version.
The DN is written as a "Backslash Separated Values" string which states who you are, which are your organization and country, who gave you that certificate and so on. For example, a sample INFN certificate reports "/C=IT/O=INFN/OU=Personal Certificate/L=yourOrgani/CN=Your Name".
Proxy Generation
After the installation of the certificate in your $HOME directory, a preliminary step to the generation of a proxy are
Installation packages of the Globus Toolkit provided by the IGE project are available through YUM and APT repositories for several platforms at this URL
Installation of certificates in your $HOME directory, following the commands:
user$ mkdir $HOME/.globus/certificates && cd $HOME/.globus/certificates
user$ wget http://dist.eugridpma.info/distribution/igtf/current/accredited/igtf-preinstalled-bundle-classic.tar.gz && tar -zxvf igtf-preinstalled-bundle-classic.tar.gz
user$ wget http://dist.eugridpma.info/distribution/igtf/current/accredited/igtf-preinstalled-bundle-mics.tar.gz && tar -zxvf igtf-preinstalled-bundle-mics.tar.gz
user$ wget http://dist.eugridpma.info/distribution/igtf/current/accredited/igtf-preinstalled-bundle-slcs.tar.gz && tar -zxvf igtf-preinstalled-bundle-slcs.tar.gz
user$ wget http://dist.eugridpma.info/distribution/igtf/current/accredited/igtf-preinstalled-bundle-iota.tar.gz && tar -zxvf igtf-preinstalled-bundle-iota.tar.gz
No valid Data Center license found
Please go to Atlassian Marketplace to purchase or evaluate Refined Toolkit for Confluence Data Center.
Please read this document to get more information about the newly released Data Center version.
Now, you can generate the X.509 proxy certificate, on the same machine where is installed your X.509 certificate
user$ grid-proxy-init
No valid Data Center license found
Please go to Atlassian Marketplace to purchase or evaluate Refined Toolkit for Confluence Data Center.Please read this document to get more information about the newly released Data Center version.
To check how long your proxy certificate is valid, use the following command:
user$ grid-proxy-info
No valid Data Center license found
Please go to Atlassian Marketplace to purchase or evaluate Refined Toolkit for Confluence Data Center.Please read this document to get more information about the newly released Data Center version.
To destroy your proxy certificate at the end of your activities, use the following command:
user$ grid-proxy-destroy
No valid Data Center license found
Please go to Atlassian Marketplace to purchase or evaluate Refined Toolkit for Confluence Data Center.Please read this document to get more information about the newly released Data Center version.
dependences: