In this page:
Additional page:
early availability:
start of pre-production:
start of production:
Model: Architecture: Cores:24 cores/node, 2,4 GHz |
|
|---|
System Architecture
The HPC cloud infrastructure, named ADA cloud is based on OpenStack Wallaby.
Provides:
- 77 interactive OpenStack nodes each 2 x CPU Intel CascadeLake 8260, with 24 cores each, 2,4 GHz, 768GB RAM and 2TB SSD storage.
- 1 PB Ceph storage for Cloud (full NVMe/SSD)
This cloud infrastructure is tightly connected both to the LUSTRE storage of 20 PB raw capacity, and to the GSS storage of 6 PB seen by all other infrastructure. This setup enables the use of all available HPC systems (Tier-0 Marconi, Tier-1 Galileo100), addressing HPC workloads in conjunction with cloud resources.
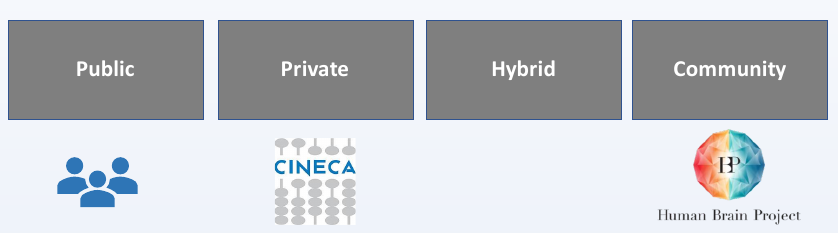
Cloud Model
From the user's perspective, ADA cloud can be seen as both a public cloud and a community cloud, with a federation of European data-centers providing features targeting specific scientific communities (i.e. the flagship Human Brain project). ADA cloud HPC infrastructure is a resource that CINECA already adopts in several internal projects and services. The deployment model is well represented by the picture below.
The ADA cloud HPC infrastructure integrates and completes the HPC ecosystem, providing a tightly-integrated infrastructure that covers both high performance and high flexible computing. We expect the flexibility of the cloud to better adapt to the diversity of user workloads, while still providing high-end computing power. If the need for High-Performance Computing increases, or scale beyond the ADA cloud HPC provision, the other world-class HPC systems (MARCONI, MARCONI100, GALILEO100) can be integrated into the workflow to cover all computing needs. For example, data can be stored on areas ($DRES ) that are seen by all HPC systems.
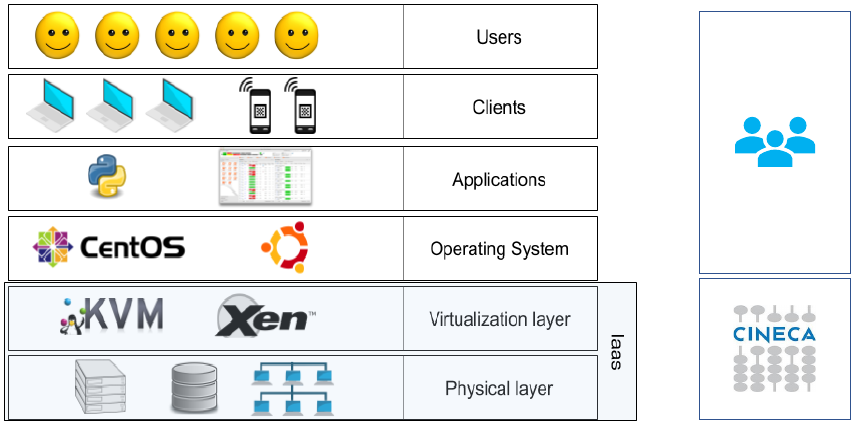
Service model
ADA cloud HPC infrastructure provides users an Infrastructure as a Service (IaaS). Along with all the advantages in terms of flexibility, there is an increased responsibility shifted from CINECA staff to users. A clear separation of roles in using the service is represented in the scheme below. This has to be understood by all actors accessing the service, even if we can provide assistance and share our expertise to help you set-up your application workflow.
There are clear benefits in using a CLOUD infrastructure with access to Virtual Machines (VMs) with respect to traditional our HPC resources. These benefits can be summarized in the table below:
| Performance | Target the highest possible | depend on workload, but generally, virtualization has a small impact |
| User access | CINECA staff authorization | Once a project is granted, it is managed by the user |
| Operating System | It is chosen by CINECA staff given the HW constraints. Security updates are managed by CINECA. | Selected by the user. Security patch and updates are managed by the user. |
| Software stack | Mostly installed by CINECA staff. Users can install their own without "root" privilege. The environment is provided "as is" | The user is root on the VMs and can install all the required software stack. Users can modify the environment to suit their needs. |
| Snapshots of the environment | Cannot be done | User can save snapshot images of the VMs |
| Running simulations | Users are provided with a job scheduler (SLURM) | Users can install a job scheduler or chose alternatives. |
Flexible authentication model
A more flexible authentication method has been deployed in the CLOUD.HPC instance. It is based on OpenID (https://openid.net/connect/), and decouples authentication (access with credentials) from authorization (application permissions after user access), as represented in the schema below.
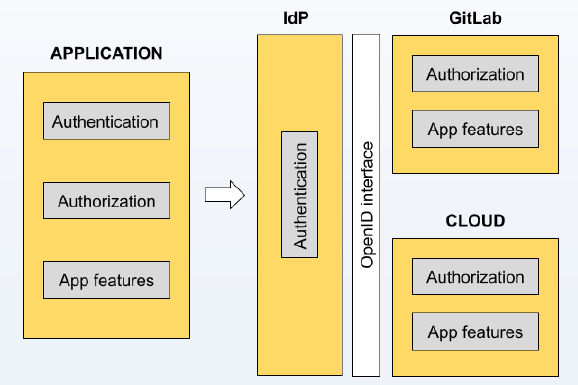
The Identity provider (IdP) can be internal (CINECA) or can be another trusted external service provider. This approach allows having in place federated identity, with a central (proxy) IdP servicing federated data-centers, as in the ICEI-Fenix model (https://fenix-ri.eu/).
Roles and responsibilities
In the context cloud HPC resources provisioning, CINECA acts accordingly to the following division of roles:
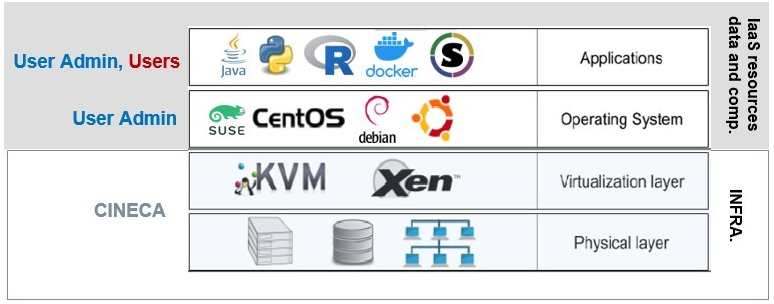
CINECA is responsible for administering the physical infrastructure and providing the virtualization layer (via Openstack)
“User Admins” and “Users” are roles acted by people external to CINECA staff (Exceptions are made for internal services). User Admins can create VM instances and configure the resources via dashboard; “Users” do not access the dashboard and are local to each VM instance (for example those added via add user linux command).
Any user (“User Admins or “Users”) with administration privileges on IaaS resources (VMs) have the responsibility to maintain the security (security patch, fix) on those resources. Anyway, from the project management perspective, CINECA will interact only to “User Admins" (User Admins are user associated to the project in CINECA resource provising portal, https://userdb.hpc.cineca.it).
Access
Log in to the dashboard
Go to the OpenStack dashboard at https://adacloud.hpc.cineca.it, select "CINECA ldP" as Authentication method, then click on "cinsdai-idp.hpc.cineca.it:8443/auth/realms/CINECA_LDAP" and at the end insert your HPC-CINECA credentials to log in.
After the log in, on the top-right of the window is displayed your user name, while on the top-left. are listed in a menu all the Projects you are associated with.

Projects are organizational units in the cloud. Each user is a member of one or more projects. Within a Project, a user can create and manage instances, security groups, volumes, images, and more.
Log in to the virtual machine
After you have created your virtual machine ( see the following section) you can log in directly using:
- the default user and key ( if you have used a native default image for cloud)
- another username (if you have used your personal image with a custom user defined in it)
Suppose you have used the default ubuntu cloud image, you can login as:
$ ssh -i MyKey.pem ubuntu@<floating IP address> Creation of an instance of the virtual machine in your Project
In order to create your own virtual machine you have to perform all the following eight steps
In order to build and use virtual machine within a specific Project, it is mandatory the presence of the internal network, subnet and router.
Select the Project of interest and check the presence of such components click on tab Project → Network → Network Topology.
If it is present only the "external network", you must create network, subnet and router. Please, follow the instruction below:
Create a private network and subnet.
Click on: Project -> Network -> Network Topology -> Create Network.
Then set:
- Tab Network:
Network name: <the name you want>
Enable Admin State: check
Create Subnet: check
Availability Zone Hints: set "nova"
MTU:set it blank. The default is 1450
- Tab subnet:
Subnet name: <the name you want>
Network Address (eg. 192.168.0.0/24)
IP Version (IPv4)
Gateway IP (eg, the last address 192.168.0.254 for subnet 192.168.0.0/24)
Disable Gateway: disabled, uncheck
- Tab Subnet Details:
Enable DHCP: enabled, check
Allocation Pools: leave blank
Host Routers: leave blank
Finally, click on "create"
Create a private router and set the gateway.
Click on: Project -> Network -> Routers -> Create Router.
Then set:
Router name: <the name you want>
Enable Admin State: check
External Network: select "externalNetwork"
Availability Zone Hints: leave "nova"
Finally, click on "create router".
Now, select the router just created and click on "Interfaces" and then on "Add interface"
subnet: select the subnet just created
IP address (write THE SAME IP ADDRESS of the gateway, in this example, it is 192.168.0.254)
Finally, click on "Submit".
Verify that the Status of router is “ACTIVE” and the Admin state is “UP”.
Keypairs are used to access virtual machines when:
- the instance is launched using a default image for cloud (e.g. centos or ubuntu)
- in the virtual machine is set a login with ssh -key
You can set up a keypair in two ways. From "Project → Compute → Key Pairs" menu, you can:
- click on "Create Key Pair", to obtain a new key pair. The possible types are SSH key or x509.
- click on "import Public Key" to import your key pair.
Remember to modify the permission of the key file to 600 in order to avoid errors when you use it to login to your virtual machine.
The firewall of the virtual machine must be defined using the OpenStack Security Groups and Security Rules.
Inside the virtual machine, the firewall must be disabled.
A security rule defines which traffic is allowed to instances assigned to the security group.
A security group is a group of security rules that can be assigned to an instance.
The security groups and security rules can be created click on "Project → Network → Security Groups ".
Common default rules are:
- SSH (port 22)
- ICMP (allow to "ping" a server)
- HTTP (port 80)
- HTTPS (port 443)
Note: It is always possible to modify, add and remove security groups in a virtual machine after its creation.
- If you modify a security group, adding or removing rules, and the security group is already associated to the virtual machine, the changes will be available in real time
- If you want to add or remove a security group from a virtual machine, click on "Project → Compute → Instances", select the virtual machine and from the menu on the right, click on "Edit Security Group". So, add or remove the security groups to the instance.
Once your key pair and your security group are defined, proceed building the virtual machine.
- Click on "Project → Compute → Instances"
- Click on "Launch instance" button
- In the "Details" box, enter:
- the instance name
- the instance number (count)
- In the "Source" box, enter:
- the boot source for the instance. It can be an image, a bootable volume or a bootable volume snapshot.
- Images: we provide some default images (centos, ubuntu, etc.). For these default images, it is set a default user can login into the virtual machine using a key pair. Such a user can execute commands as root. The password of the user root is embedded. If you want to use your personal image, you can create it in the cloud environment click on "Project → Compute → Images", the "Create Image" and upload it.
- Note If you want to create a bootable volume from your instance, select "yes" in "Create New Volume" and select the size of such volume.
- the boot source for the instance. It can be an image, a bootable volume or a bootable volume snapshot.
- In the "Flavor" box, select the flavor you want to use, accordingly with the resources you have.
- NB: if you select to create a volume from your instance, the root disc of the virtual machine will have the size of the volume, not the size set in the flavor
- In the "Networks" box, enter the network internal to your project on which connect the virtual machine
- In the "Security Groups" box, select the security groups you want. Remember that you can always modify them after the virtual machine creation.
- In the "Key Pair" box, select the key pair you want to use for ssh login.
The boot process can be followed on the instances screen. Once the VM is in state ACTIVE, you will be able to open the console and follow the boot process.
To follow the installation, you can access the graphical console using the browser once the VM is in BUILD state.
The console is accessed by selecting the "Instance Details" for the machine and then click on the tab "Console".
Login to the virtual machine using ssh
After the association of a Floating IP to your virtual machine, you can login using the default user and key ( if you have used a native default image for cloud), or using another username (if you have used your personal image with a custom user defined in it). Suppose you have used the default ubuntu cloud image, you can login as:
$ ssh -i MyKey.pem ubuntu@<floating IP address>
Quotas, Flavors and Images
Quotas
Each project is assigned a quota that defines the resources it can use.
When resource consuming operations such as virtual machine creation are performed, the request is validated against the maximum quota permitted for the current project (as set by the environment variables or Horizon dashboard).
The default project quota is:
| Compute | Limit | Volume | Limit | |
|---|---|---|---|---|
| Instances | 10 | Volume Storage | 10 | |
| VCPUs | 4 | Volume Snapshots | 10 | |
| RAM (GB) | 30 | Volume Storage (GB) | 512 |
| Network | Limit |
| Floating IPs | 1 |
| Security Groups | 10 |
| Security Group Rules | 20 |
| Networks | 2 |
| Ports | 50 |
| Routers | 2 |
A flavor defines the virtual machine size such as
- Number of VCPUs
- Amount of memory
- Disk space (system disk, ephemeral disk, and swap)
A standard set of flavors allows predictable distribution of applications across multiple hypervisors.
| Flavour Name | VCPUs | RAM GB | Disk GB | Public-available for all projects |
| fl.ada.xxs | 1 | 7,5 | 10 | yes |
| fl.ada.xs | 2 | 15 | 30 | yes |
| fl.ada.s | 4 | 30 | 30 | yes |
| fl.ada.m | 8 | 60 | 30 | yes |
| fl.ada.l | 16 | 120 | 30 | yes |
| fl.ada.xl | 24 | 180 | 30 | On-demand |
| fl.ada.xxl | 48 | 360 | 30 | On-demand |
| fl.ada.full | 96 | 720 | 30 | On-demand |
OpenStack images provide the source for booting a virtual machine. An image consists of an operating system, some optional additional packages and some flags to help OpenStack place these on the right hypervisor.
For more detailed information about OpenStack's image management, the OpenStack image creation documentation provides further references and links.
The complete list of provided images is available by click on the tab "Images" and then on "Public" tab on the right in the Openstack Dashbord.
In what folllow there is the list of the default images provided for all projects.
IMPORTANT NOTE: It is not admitted building Windows virtual machine on ADA cloud, even if the user has its own windows licence.
| Image Name | Image information | Default user | Password |
| CentOS-7-x86_64-GenericCloud-2009 | CentOS-7-x86_64-GenericCloud-2009.qcow2, last modified 2020-11-12 | centos | ssh access by key |
| CentOS-8-GenericCloud-8.4.2105-20210603.0.x86_64 | CentOS-8-GenericCloud-8.4.2105-20210603.0.x86_64, last modified 2021-06-03 | centos | ssh access by key |
| Ubuntu 18.04 LTS (Bionic Beaver) | Ubuntu server 18.04 (Bionic Beaver) LTS for cloud Source: https://cloud-images.ubuntu.com/ | ubuntu | ssh access by key |
| Ubuntu Server 20.04 LTS (Focal Fossa) | focal-server-cloudimg-amd64.img, last modified 2021-07-20 Source: https://cloud-images.ubuntu.com/ | ubuntu | ssh access by key |
| Ubuntu Server 21.04 (Hirsute Hippo) | hirsute-server-cloudimg-amd64.img, last modified 2021-07-20 Source: https://cloud-images.ubuntu.com/ | ubuntu | ssh access by key |
Operations with an instance
Create an instance snapshot
- Log in to the virtual machine and shutdown the instance
- Log in to the dashboard, choose the right project, and click Instances.
- Check that the instace to snapshot is Shutoff
- Select such instance
- In the Actions column, click Create Snapshot.
- In the Create Snapshot dialog box, enter a name for the snapshot, and click Create Snapshot.The Images category shows the instance snapshot.
To launch an instance from the snapshot, select the snapshot and click Launch. Proceed with launching an instance.
Manage an instance
- Log in to the virtual machine and shutdown the instance
Log in to the dashboard, choose the right project, and click Instances.
Select an instance.
In the More list in the Actions column, select the state.
You can resize or rebuild an instance. You can also choose to view the instance console log, edit instance or the security groups. Depending on the current state of the instance, you can pause, resume, suspend, soft or hard reboot, or terminate it.
Track usage for instances
You can track usage for instances for each project. You can track costs per month by showing metrics like number of vCPUs, disks, RAM, and uptime for all your instances.
Log in to the dashboard, choose a project, and click Overview.
To query the instance usage for a month, select a month and click Submit.
To download a summary, click Download CSV Summary.
Cinder Volumes
Volumes are block storage devices that you attach to instances to enable persistent storage.
After the creation, you must attach the volume to a running instance and then mount it from inside the virtual machine. A volume can be also detached from an instance, and attached to another instance at any time. It is also possible to create a snapshot from a volume and/ or delete it.
Operations with Cinder Volumes
- Creation of a Cinder Volume
a) Log in to the dashboard, choose a project, and click on "Projects → Volumes → Volumes".
b) Click on "Create Volume" button:
In the dialog box that opens, enter or select the following values.
Volume Name: Specify a name for the volume.
Description: Optionally, provide a brief description for the volume.
Volume Source: Select one of the following options:
No source, empty volume: Creates an empty volume. An empty volume does not contain a file system or a partition table.
Image: If you choose this option, a new field for Use image as a source displays. You can select the image from the list.
Type:
- __DEFAULT __ is a general cinder volume
- LUKS is for encrypted volumes. Ask to superc@cineca.it to be enabled to use this.
Size (GiB): The size of the volume in gibibytes (GiB).
c) Finally, click on Create Volume button.
The dashboard shows the volume on the Volumes tab.
- Attach the volume to a running instance
After you have created the volume, you have to attach it to instances, in order to use it. You can attach a volume to one instance at any time.
Log in to the dashboard, choose a project, and click on "Projects → Volumes → Volumes".
Select the volume to add to an instance and click "Edit Attachments".
In the Manage Volume Attachments dialog box, select an instance.
Enter the name of the device from which the volume is accessible by the instance.
Click Attach Volume.
The dashboard shows the instance to which the volume is now attached and the device name.
You can view the status of a volume in the Volumes tab of the dashboard. The volume is either Available or In-Use.
Now you can log in to the instance and mount, format, and use the disk.
- Attach the volume to a running instance
After a cinder volume has been created and attached to a virtual mahine using the OpenStack, in order to use for storing data its needed to partition, format and mount it. This operations has to be done inside the virtual machine.
Following, some suggestion to perform these operations
Partition Table
Suppose that the volume is attached to the virtual machine as device /dev/vdc.
Login in to the virtual machine and use fdisk to modify the partition table.
- list the partition table
sudo fdisk -l
- partition of device /dev/vdc
sudo fdisk /dev/vdc
# 1 new partition, primary, with default sector numbers and type "Linux"
==> n; p; 1 ; ...default ;
# check and write
==> p; w
Format the device /dev/vdc just partitiones as xfs:
sudo mkfs -t xfs /dev/vdc1
Mount the volume:
sudo mkdir /mnt/stuff_1
sudo mount /dev/vdc1 /mnt/stuff_1
To mount the volume automatically at each boot of the virtual machine, please modify the /etc/fstab file.
Following the example, in the /etc/fstab could be written:
/dev/vdc1 /mnt/stuff_1 ext4 auto,nofail,defaults 0 0
4. Detach a volume from an instance
- Log into the virtual machine and umount the volume.
Take care: if you had written the automatic mount of the volume in the file /etc/fstab, plese comment or cancel the line in the file.
- Log in to the dashboard, choose a project, and click Volumes.
- Select the volume and click Edit Attachments.
- Click Detach Volume and confirm your changes.
- Log into the virtual machine and umount the volume.
A message indicates whether the action was successful.
5.
Log in to the dashboard, choose a project, and click Volumes.
Select a volume from which to create a snapshot.
From the More list, select Create Snapshot.
In the dialog box that opens, enter a snapshot name and a brief description.
Confirm your changes.
The dashboard shows the new volume snapshot in Volume Snapshots tab.
6. Delete a volume
When you delete an instance, the data in its attached volumes is not destroyed.
Log in to the dashboard, choose a project, and click Volumes.
Select the check boxes for the volumes that you want to delete.
Click Delete Volumes and confirm your choice. A message indicates whether the action was successful.