...
Model: DUal-Socket Dell PowerEdge Cloud Platform: OpenStack version WallabyZed |
|
|---|

...
System Architecture
The HPC cloud infrastructure, named ADA cloud is based on OpenStack WallabyZed.
Provides:
- 71 interactive OpenStack nodes each 2 x CPU Intel CascadeLake 8260, with 24 cores each, 2,4 GHz, 768GB RAM and 2TB SSD storage.
- 1 PB Ceph storage raw dedicated (full NVMe/SSD)
This cloud infrastructure is tightly connected both to the LUSTRE storage of 20 PB raw capacity, and to the GSS storage of 6 PB seen by all other infrastructure. This setup enables the use of all available HPC systems (Tier-0 Marconi, Tier-1 Galileo100), addressing HPC workloads in conjunction with cloud resources.
...
IMPORTANT NOTE: It is not admitted building Windows virtual machine on ADA cloud, even if the user has its own windows licencelicense.
| Image Name | Image information | Default user | Password |
| CentOS-7-x86_64-GenericCloud-2009 | CentOS-7-x86_64-GenericCloud-2009.qcow2, last modified 2020-11-12 | centos | ssh access by key |
| CentOS-8-GenericCloud-8.4.2105-20210603.0.x86_64 | CentOS-8-GenericCloud-8.4.2105-20210603.0.x86_64, last modified 2021-06-03 | centos | ssh access by key |
| Ubuntu 18.04 LTS (Bionic Beaver) | Ubuntu server 18.04 (Bionic Beaver) LTS for cloud Source: https://cloud-images.ubuntu.com/ | ubuntu | ssh access by key |
| Ubuntu Server 20.04 LTS (Focal Fossa) | focal-server-cloudimg-amd64.img, last modified 2021-07-20 Source: https://cloud-images.ubuntu.com/ | ubuntu | ssh access by key |
| Ubuntu Server 21.04 (Hirsute Hippo) | hirsute-server-cloudimg-amd64.img, last modified 2021-07-20 Source: https://cloud-images.ubuntu.com/ | ubuntu | ssh access by key |
| Ubuntu Server 22.04 LTS (Jammy Jellyfish) | jammy-server-cloudimg-amd64.img, last modified 2022-09-02 Source: https://cloud-images.ubuntu.com/ | ubuntu | ssh access by key |
| Rocky Linux 8.9 | File description: https://wiki.rockylinux.org/rocky/image/#about-cloud-images | rocky | ssh access by key |
| Rocky Linux 9.3 | File description: https://wiki.rockylinux.org/rocky/image/#about-cloud-images | rocky | ssh access by key |
...
Go to the OpenStack dashboard at https://adacloud.hpc.cineca.it, select "CINECA HPC" as Authentication method, then insert your HPC-CINECA credentials to log in, together with the 2nd factor for authentication (see section How to connect via 2FA for more information).
After the log in, on the top-right of the window is displayed your user name, while on the top-left. are listed in a menu all the Projects you are associated with.

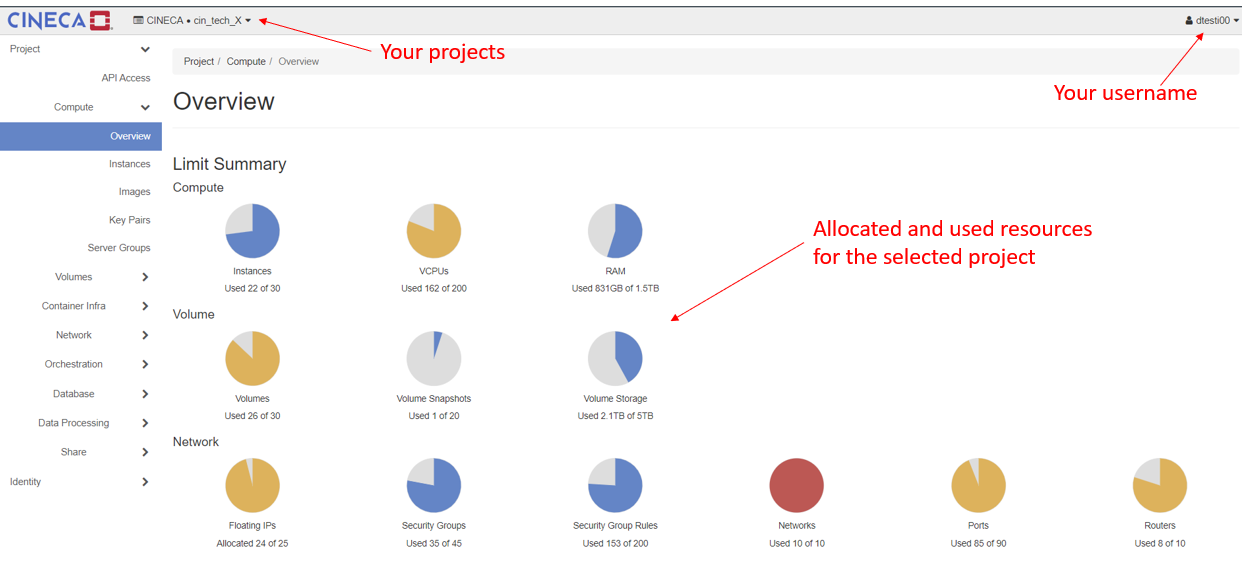
Projects are organizational units in the cloud. Each user is a member of one or more projects. Within a Project, a user can create and manage instances, security groups, volumes, images, and more.
...
...
Users are able to resize autonomously their VM, but, since there is a bug in current version the OpenStack Horizon in ADA cloud, this operation can be done only this operation can be done either via OpenStack Dashboard or via OpenStack CLI.
To know how to configure and use the OpenStack CLI, please refer to the link OpenStack CLI .
Before to perform the resize operation:
- The VM must be shut off.
If there are encrypted LUKS VOLUMESattached to the virtual machine, it is mandatory that the user:
Unmount the volumes from the VM
Detach the volumes from the Openstack Dashboard
Resize using the dashboard
To resize a the VM, it is necessary to:
- Identify In the tab Instances, find the VM ID:
Identify the IDof the new flavor the VM needs:Code Block language bash openstack server list --all | grep <VM_name> openstack server show < vm_ID > | grep flavorCode Block language bash openstack flavor list In the case of an Ephemeral VM, check the size of root disk of the original VM. Don't resize the VM if the new flavor has a disk smaller than the current one.
In the case of a VM with aBootable Disk, the resize will affect only VCPUs number and RAM. The bootable disk will not be changed by the operation.you need to resize- From the drop-down menu on the right select "resize instance"
- A menu will popup where you can choose the new desired flavor and click "resize"
- OpenStack will prepare the operation and then wait for user input to confirm or revert the operation
- From the drop-down menu on the right select either "confirm resize/migration" if you want to continue, or "revert resize/migration" if you want to keep the original flavor.
Resize using the CLI
To know how to configure and use the OpenStack CLI, please refer to the link OpenStack CLI .
To resize a VM, it is necessary to:
Identify theVM ID:
Perform the resize, remembering to alert the user of the VM's temporary shutdown during the operation.
Code Block language bash openstack server resizelist --flavor <new_flavor_ID> --wait <vm_ID>all | grep <VM_name> openstack server show < vm_ID > | grep flavor
Identify the IDof the new flavor the VM needsWait then the operation to "Complete"; at the same time, on the Openstack Dashboard the message "Confirm" will appear next to the server name. Then use the command:
Code Block language bash openstack server resize confirm <vm_ID>flavor list
In the case of an Ephemeral VM, check the size of root disk of the original VM. Don't resize the VM if the new flavor has a disk smaller than the current one.
In the case of a VM with aBootable Disk, the resize will affect only VCPUs number and RAM. The bootable disk will not be changed by the operation.
Perform the resize, remembering to alert the user of the VM's temporary shutdown during the operation.Issue theresize confirmation in a separate command, since the option
--confirmon the commandopenstack serverresizeis deprecated.Verify the success of the operation. Since the Dashboard can have visualization bugs, it is best to check via CLI:Code Block language bash openstack server showresize < vm_ID > | grep flavor--flavor <new_flavor_ID> --wait <vm_ID>
Wait then the operation to "Complete"; at the same time, on the Openstack Dashboard the message "Confirm" will appear next to the server name. Then use the commandAsk the user to confirm the success of the operation. To do that they will need to boot the VM, login, and verify the VCPUs number and Memory size are correct with the following commands:
Code Block language bash cat /proc/cpuinfo free -g
Resize of a VM's Bootable Volume
...
openstack server resize confirm <vm_ID>Issue theresize confirmation in a separate command, since the option
--confirmon the commandopenstack serverresizeis deprecated.Verify the success of the operation. Since the Dashboard can have visualization bugs, it is best to check via CLI:
Code Block language bash openstack server show < vm_ID > | grep flavorAsk the user to confirm the success of the operation. To do that they will need to boot the VM, login, and verify the VCPUs number and Memory size are correct with the following commands:
Code Block language bash cat /proc/cpuinfo free -g
Resize of a VM's Bootable Volume
If a user owning a VM with a Bootable Volumeneeds to resize it to make it bigger (never SMALLER, in order to avoid breaking the VM), they can perform the operation themselves via Openstack Dashboard:
Checking there is enough free space usable on their tenant;
Shutting down the VM;
Clicking on the Bootable Volume, then on Extend Volume inside the right menu, writing there the desired new volume size;
Rebooting the VM and check that the volume has the correct size, using the command
df -h.
Download a VM
To download a VM, it is necessary to create a snapshot of it on the Openstack Dashboard, and then save locally the snapshot using the Command-line interface.
Shutdown the VM
Detach any secondary volume attached on the VM (remember the volume
/dev/vdais the bootable volume from which the VM is loaded).Create the VM snapshot
If the VM is loaded from an image (there is no bootable volume
/dev/vda):Click on create snapshot, and select format qcow2.
The snapshot should appear in the image list with size different from zero.
If the VM is loaded form a bootable volume (volume attached as
/dev/vda):Select the bootable volume,
Create a snapshot of the volume,
Create a volume from this snapshot.
From the new created volume, click on upload to image and then choose as disk format qcow2 . (this operation is slower than the other)
The snapshot should appear in the image list with size different from zero.
Now from the CLI:
Setup the environment
Search the snapshot image created earlier, and get the Image ID
Code Block language bash openstack image list
Save the image on local hardware
Code Block language bash openstack image save --file <img_file_name> <image_snapshot_ID>Check the downloaded image info to be sure the process has been executed correctly
Code Block language bash qemu-img info <img_file_name>
...
Checking there is enough free space usable on their tenant;
Shutting down the VM;
Clicking on the Bootable Volume, then on Extend Volume inside the right menu, writing there the desired new volume size;
Rebooting the VM and check that the volume has the correct size, using the command
df -h ....
Cinder Volumes
Volumes are block storage devices that you attach to instances to enable persistent storage.
...
By using the Openstack dashboard, every user can create such volumes and then attach them to a virtual machine. Due to a limitation of the crypto library, the maximum size of each volume is 15 TB.
Since LUKS are encrypted volumes, the time needed to create one can vary greatly with respect to the size of the volume to create (most of which is the time needed to encrypt the data).
Here are some indicative times needed to create different sized LUKS volumes from the dashboard (stime):
- 1 TiB: 15 minutes
- 7 TiB: 2 hours
- 10 TiB: 3-4 hours
The user can access the data stored in such LUKS volumes by login into the corresponding virtual machine. Only the users with authorisation to login into the virtual machine will access the data "in clear", even if it is encrypted by key.
...