| Table of Contents |
|---|
...
hostname: login.m100.cineca.it
early availability: April 20, 2020
start of production: to be defined (April 27, 2020)
...
This system is an upgrade of the "not conventional" partition of the Marconi Tier-0 system. It is an accelerated cluster based on Power9 chips and Volta NVIDIA GPUs, acquired by Cineca within the PPI4HPC European initiative.
...
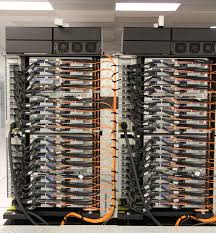
Model: IBM Power AC922 (Whiterspoon) Racks: 55 total (49 compute) |
|
|---|
More technical details on this architecture can be found on the IBM RedBook series:
...
which establishes a connection to one of the available login nodes. To connect to Marconi100 you can also indicate explicitly the login nodes. :
> login01.m100.cineca.it
> login02.m100.cineca.it
> login03.m100.cineca.it
For information about data transfer from other computers please follow the instructions and caveats on the dedicated section Data storage or the document Data Management.
...
The account_no (or project) is important for batch executions. You need to indicate an account_no to be accounted for in the scheduler, using the flag "-A"
#SBATCH -A <account_no>
With the "saldo -b" command you can list all the account_no associated with your username. > saldo -b
> saldo -b (reports projects defined on M100 )
Please note that the accounting is in terms of consumed core hours, but it strongly depends also on the requested memory and number of GPUs, please refer to the dedicated section.
Budget Linearization policy
On M100, as on the other HPC clusters in Cineca, a linearization policy for the usage of project budgets has been defined and implemented. For each account, a monthly quota is defined as:
monthTotal = (total_budget / total_no_of_months)Starting from the first day of each month, the collaborators of any account are allowed to use the quota at full priority. As long as the budget is consumed, the jobs submitted from the account will gradually lose priority, until the monthly budget (monthTotal) is fully consumed. At that moment, their jobs will still be considered for execution, but with a lower priority than the jobs from accounts that still have some monthly quota left.
This policy is similar to those already applied by other important HPC centers in Europe and worldwide. The goal is to improve the response time, giving users the opportunity of using the cpu hours assigned to their project in relation to their actual size (total amount of core-hours).
Disks and Filesystems
The storage organization conforms to the CINECA infrastructure (see Section Data Storage and Filesystems).
In addition to the home directory $HOME, for each user is defined a scratch area $CINECA_SCRATCH, a large disk for the storage of run time data and files.
A $WORK area is defined for each active project on the system, reserved for all the collaborators of the project. This is a safe storage area to keep run time data for the whole life of the project.
...
Total Dimension (TB)
...
Quota (GB)
...
Notes
...
- permanent/backed up, user specific, local
...
- temporary, user specific, local
- no backup
- automatic cleaning procedure of data older than 40 days (time interval can be reduced in case of critical usage ratio of the area. In this case, users will be notified via HPC-News)
...
- permanent, project specific, local
- no backup
- extensions can be considered if needed (mailto: superc@cineca.it)
The goal is to improve the response time, giving users the opportunity of using the cpu hours assigned to their project in relation to their actual size (total amount of core-hours).
Disks and Filesystems
The storage organization conforms to the CINECA infrastructure (see Section Data Storage and Filesystems).
In addition to the home directory $HOME, for each user is defined a scratch area $CINECA_SCRATCH, a large disk for the storage of run time data and files.
A $WORK area is defined for each active project on the system, reserved for all the collaborators of the project. This is a safe storage area to keep run time data for the whole life of the project.
Total Dimension (TB) | Quota (GB) | Notes | |
|---|---|---|---|
| $HOME | 200 | 50 |
|
| $CINECA_SCRATCH | 2.000 | no quota |
|
| $WORK | 4.000 | 1.024 |
|
$DRES environment variable points to the shared repository where Data RESources are maintained. This is a data archive area available only on-request, shared with all CINECA HPC systems and among different projects. $DRES is not mounted on the compute nodes of the production partitions and can be accessed only from login nodes and from the nodes of the serial partition. This means that you cannot access it within a standard batch job: all data needed during the batch execution has to be moved to $WORK or $CINECA_SCRATCH before the run starts, either from the login nodes or via a job submitted to the serial partition.
Since all the filesystems are based on IBM Spectrum Scale™ file system (formerly GPFS), the usual unix command "quota" is not working. Use the local command cindata to query for disk usage and quota ("cindata -h" for help):
> cindataModules environment
The software modules are collected in different profiles and organized by functional categories (compilers, libraries, tools, applications,..). The profiles are of two types, “domain” type (chem, phys, lifesc,..) for the production activity and “programming” type (base and advanced) for compilation, debugging and profiling activities and that they can be loaded together.
"Base" profile is the default. It is automatically loaded after login and it contains basic modules for the programming activities (intel e gnu compilers, math libraries, profiling and debugging tools,..).
If you want to use a module placed under other profiles, for example an application module, you will have to load preventively the corresponding profile:
>module load profile/<profile name>
>module load autoload <module name>
For listing all profiles you have loaded you can use the following command:
>module listIn order to detect all profiles, categories and modules available on MARCONI100 the command “modmap” is available. With modmap you can see if the desired module is available and which profile you have to load to use it.
>modmap -m <module_name>Spack environment
In case you don't find a software you are interested in, you can install it by yourself.
In this case, on Marconi100 we also offer the possibility to use the “spack” environment by loading the corresponding module. Please refer to the dedicated section in UG2.6: Production Environment
GPU and intra/inter connection environment
Marconi100 consists of 980 compute nodes and 8 login nodes, connected with a Mellanox Infiniband EDR network arranged into an architecture called DragonFly ++.
The login nodes and the compute nodes are exactly the same. Each node consists in 2 Power9 sockets, each of them with 16 cores and 2 Volta GPUs (32 cores and 4 GPUs per node). The multi-threading is active with 4 threads per physical core (128 total threads – or logical cpus – per node).
Due to how the hardware is detected on a Power9 architecture, the numbering of (logical) cpus follows the order of threading. You can get it with the ppc64_cpu command:
$ ppc64_cpu --infoCore 0: 0* 1* 2* 3*
Core 1: 4* 5* 6* 7*
Core 2: 8* 9* 10* 11*
Core 3: 12* 13* 14* 15*
...... (Cores from 4 to 28)........
Core 29: 116* 117* 118* 119*
Core 30: 120* 121* 122* 123*
Core 31: 124* 125* 126* 127*
The topology of the node can be visualized by running the command nvidia-smi as follows:
$ nvidia-smi topo -mGPU0 GPU1 GPU2 GPU3 CPU Affinity
GPU0 X NV3 SYS SYS 0-63
GPU1 NV3 X SYS SYS 0-63
GPU2 SYS SYS X NV3 64-127
GPU3 SYS SYS NV3 X 64-127
From the output of the command it is possible to see that GPU0 and GPU1 are connected with the NVLink (NV3), as well as the couple GPU2 & GPU3. The first couple is connected to (virtual) cpus 0-63 (on the first socket), the second to (virtual) cpus 64-127 (on the second socket). The cpus are numbered from 0 to 127 because of a hyperthreading. The two Power9 sockets are connected by a 64 GBps X bus. Each of them is connected with 2 GPUs via NVLink 2.0.

The knowlwdge of the topology of the node is important for correctly distribute the parallel threads of your applications in order to get the best performances.
The internode communications is based on a Mellanox Infiniband EDR network, and the OpenMPI and IBM MPI Spectrum libraries are configured so to exploit the Mellanox Fabric Collective Accelerators (also on CUDA memories) and Messaging Accelerators.
nVIDIA GPUDirect technology is fully supported (shared memory, peer-to-peer, RDMA, async), enabling the use of CUDA-aware MPI.
Production environment
Since M100 is a general purpose system and it is used by several users at the same time, long production jobs must be submitted using a queuing system (scheduler). This guarantees that the access to the resources is as fair as possible. On Marconi100 the available scheduler is SLURM.
Marconi100 is based on a policy of node sharing among different jobs, i.e. a job can ask for resources and these can also be a part of a node, for example few cores and 1 GPUs. This means that, at a given time, one physical node can be allocated to multiple jobs of different users. Nevertheless, exclusivity at the level of the single core and GPU is guaranteed by low-level mechanisms.
Roughly speaking, there are two different modes to use an HPC system: Interactive and Batch. For a general discussion see the section Production Environment and Tools.
Interactive
A serial program can be executed in the standard UNIX way:
> ./programThis is allowed only for very short runs on the login nodes, since the interactive environment has a 10 minutes cpu-time limit. Please do not execute parallel applications on the login nodes!
A serial (or parallel) program, also using GPUs and needing more than 10 minutes can be executed interactively within an "Interactive" SLURM batch job.
A request for resources allocation on the compute nodes is delivered to SLURM with the salloc/srun commands, the request is queued and scheduled as any other batch job but, when granted, the standard input, output, and error streams of the interactive job are connected to the terminal session from which the request was launched.
For example, to start an interactive session on one node and get the full node in exclusive way (including the four GPUs) for one hour, launch the command:
>
> salloc -N1 --exclusive --gres=gpu:4 -A <account_name> -p <partition_name> --time=01:00:00
salloc: Granted job allocation 1174
…
Run here your applications using srun or mpirun for example:
- srun -n 1 serial.exe (serial or OpenMP application)
- srun -n 4 parallel.exe (MPI or mixed application)
Stop the session with exit or ^D
exit
salloc: Relinquishing job allocation 1174
>
In the following is reported an interactive job on 2 cores and two GPUs. Within the job a parallel (MPI) program using 2 MPI tasks and two GPUs is executed. Since the request of tasks per node (--ntasks-per-node) refers to the 128 (virtual) cpus, if you want 2 physical cores you also have to specify that each task is made of 4 (virtual) cpus (--npus-per-taks=4).
$DRES environment variable points to the shared repository where Data RESources are maintained. This is a data archive area available only on-request, shared with all CINECA HPC systems and among different projects. $DRES is not mounted on the compute nodes of the production partitions and can be accessed only from login nodes and from the nodes of the serial partition. This means that you cannot access it within a standard batch job: all data needed during the batch execution has to be moved to $WORK or $CINECA_SCRATCH before the run starts, either from the login nodes or via a job submitted to the serial partition.
Since all the filesystems are based on IBM Spectrum Scale™ file system (formerly GPFS), the usual unix command "quota" is not working. Use the local command cindata to query for disk usage and quota ("cindata -h" for help):
> cindataGPU and intra/inter connection environment
Marconi100 login and compute nodes host four Tesla Volta (V100) GPUs per node (CUDA compute capability 7.0). The most recent versions of nVIDIA CUDA toolkit and of the Community Edition PGI compilers (supporting CUDA Fortran) is available in the module environment, together with a set of GPU-enabled libraries, applications and tools.
The topology of the nodes is reported below: the two Power9 CPUs (each with 16 physical cores) are connected by a 64 GBps X bus. Each of them is connected with 2 GPUs via NVLink 2.0.
The topology of the node can be visualized by running the command nvidia-smi as follows:
$ nvidia-smi topo -m
        GPU0   GPU1   GPU2   GPU3   CPU Affinity
GPU0     X     NV3    SYS    SYS    0-63
GPU1    NV3     X     SYS    SYS    0-63
GPU2    SYS    SYS     X     NV3    64-127
GPU3    SYS    SYS    NV3     X     64-127
from the output of the command it is possible to see that GPU0 and GPU1 are connected with the NVLink, as well as the couple GPU2 & GPU3. The first couple is connected to cpus 0-63, the second to cpus 64-127. The cpus are numbered from 0 to 127 because ofa hyperthreading of four: 32 physical core x 4 → 128 cpus.
The knowledge of the topology of the node is important for correctly distribute the parallel threads of your applications in order to get the best performances.
The internode communications is based on a Mellanox Infiniband EDR network, and the OpenMPI and IBM MPI Spectrum libraries are configured so to exploit the Mellanox Fabric Collective Accelerators (also on CUDA memories) and Messaging Accelerators.
nVIDIA GPUDirect technology is fully supported (shared memory, peer-to-peer, RDMA, async), enabling the use of CUDA-aware MPI.
Modules environment
The software modules are collected in different profiles and organized by functional categories (compilers, libraries, tools, applications,..).
On MARCONI100 the profiles are of two types, “domain” type (chem, phys, lifesc,..) for the production activity and “programming” type (base and advanced) for compilation, debugging and profiling activities and that they can be loaded together.
"Base" profile is the default. It is automatically loaded after login and it contains basic modules for the programming activities (intel e gnu compilers, math libraries, profiling and debugging tools,..).
If you want to use a module placed under other profiles, for example an application module, you will have to load preventively the corresponding profile:
>module load profile/<profile name>>module load autoload <module name>For listing all profiles you have loaded you can use the following command:
>module listIn order to detect all profiles, categories and modules available on MARCONI100 the command “modmap” is available:
>modmapWith modmap you can see if the desired module is available and which profile you have to load to use it.
>modmap -m <module name>Spack environment
In case you don't find a software you can choose to install it by yourself.
In this case, on Marconi100 we also offer the possibility to use the “spack” environment by loading the corresponding module:
$ module load spack/<vers>By loading this spack module, setup-env.sh file is sourced. Then $SPACK_ROOT is initialized to /cineca/prod/opt/tools/spack/<vers>/none, spack command is added to your PATH, and some nice command line integration tools too.
A folder is created into your default $WORK space ($USER/spack-<vers>) in order to contain some subfolders created and used by spack during the phase of a package installation:
- sources cache: $WORK/$USER/spack-<vers>/cache
- software installation root: $WORK/$USER/spack-<vers>/install
- module files location: $WORK/$USER/spack-<vers>/modulefiles
You can consult the spack guide in which you can find how to customize these paths.
The software we have installed through Spack is available as module by typing the following commands:
$ module load spack$ module av$ module av <module_name>or as spack packages:
$ module load spack$ spack find$ spack find <pack_name>You can show the dependencies, variants, and flags used for the installation of a specific package and the path where are located its binaries typing the following command:
$ spack find -ldvrp <name>In order to find all the compilers available you can type the following command:
$ spack compiler listIn order to install software through this spack module you can 1) install the needed compilers and libraries on which it depends on spack too or 2) use the corresponding modules already available for the cluster users.
In the first case, after installing the needed compiler through spack, remember to load the corresponding module and add it to compilers.yaml file by typing the following commands:
$ module load <compiler>$ spack compiler findThe file compilers.yaml is created by default into $HOME/.spack/<platform> path.
In the second case, you use the compiler module already installed on the cluster, you have to specify it simply:
#e.g. gcc 8.3.0:
$ spack install <pack> %gcc@8.3.If you want to use a library already available on the cluster in order to install your application through spack module you have to specify it through ^ type:
#e.g. zlib@1.2.11
$ spack <pack> ^zlib@1.2.11Production environment
Since M100 is a general purpose system and it is used by several users at the same time, long production jobs must be submitted using a queuing system. This guarantees that the access to the resources is as fair as possible.
Roughly speaking, there are two different modes to use an HPC system: Interactive and Batch. For a general discussion see the section Production Environment and Tools.
Each node of Marconi100 consists in 2 Power9 sockets with 16 cores and 2 Volta GPUs per socket (32 cores and 4 GPUs per node). The multi-threading is active with 4 threads per physical core (128 total logical cpus).
Due to how the hardware is detected on a Power9 architecture, the numbering of (logical) cores follows the order of threading:
$ ppc64_cpu --info
Core 0: 0* 1* 2* 3*Core 1: 4* 5* 6* 7*Core 2: 8* 9* 10* 11* Core 3: 12* 13* 14* 15*.............. (Cores from 4 to 27)........................
Core 28: 112* 113* 114* 115*Core 29: 116* 117* 118* 119* Core 30: 120* 121* 122* 123*Core 31: 125* 126* 127*Since the nodes can be shared by users, Slurm has been configured to allocate one (physical) task per core by default. Without this option, by default one task will be allocated per thread on nodes with more than one ThreadsPerCore (as it is on Marconi100).
As a result of such configuration, for each requested task a physical core with all its 4 threads will be allocated to the task. The use of --cpus-per-task is hence discouraged as a sbatch directive, potentially leading to incorrect allocation. You can then exploit the multithreading capability with 4 MPI processes per physical core or opportunely combining MPI processes and OpenMP threads, if adequate for your application.
Since a physical core (4 HTs) is assigned to one task, a maximum of 32 tasks per node can be asked (--ntasks-per-node), corresponding (as mentioned) to receive 4 logical cpus per task.
Interactive
A serial program can be executed in the standard UNIX way:
> ./programThis is allowed only for very short runs on the login nodes, since the interactive environment has a 10 minutes time limit.
A serial (or multithreaded) program using GPUs and needing more than 10 minutes can be executed interactively within an "Interactive" SLURM batch job, using the "srun" command: the job is queued and scheduled as any other job but, when executed, the remote standard input, output, and error streams are connected to the terminal session from which srun was launched.
For example, to start an interactive session on one node and one GPU launch the command:
> srun -N1 --ntasks-per-node=1 --gres=gpu:1 -A <account_name> --time=01:00:00 --pty /bin/bashSLURM will then schedule your job to start, and your shell will be unresponsive until free resources are allocated for you. When the shell come back with the prompt (the hostname at the prompt will be that of the assigned node), launch the program in the standard way:
> ./programAs mentioned above, the accounting of the consumed core hours takes into account also the memory and the number of requested GPUs (see the dedicated section). For instance, a job using one core and one GPU for one hour (with the default memory per core) will consume 8 core-hours (each node being equipped with 32 physical cores and 4 V100 GPUs).
A parallel (MPI) program using GPUs and needing more than 10 minutes can as well been executed in an interactive SLURM batch jobs, using the "salloc" command in the place of "srun --pty bash". For instance:
> salloc -N1 --ntasks-per-node=16 --gres=gpu:2 -A <account_name> --time=01:00:00 Again, the job is queued and scheduled as any other job and, when executed, a new session starts on the login node from which salloc was launched (the hostname at the prompt will be that of the login node). You can now run your parallel program on the assigned compute node(s) as in any slurm parallel job:
> srun ./myprogramor
> mpirun ./myprogramsrun/mpirun will dispatch the tasks of the program myprogram to the assigned compute node, i.e., the tasks do not run on the login node hosting the salloc session.
Please note that the recommended way to launch parallel tasks in slurm jobs is with srun. By using srun vs mpirun you will get full support for process tracking, accounting, task affinity, suspend/resume and other features.
A hybrid parallel (MPI/OpenMP) program using GPUs and needing more than 10 minutes can also be executed in an interactive SLURM batch jobs with the "salloc" command. For instance:
> salloc -N1 --ntasks-per-node=4 --cpus-per-task=4 --gres=gpu:2 -A <account_name> --time=01:00:00 > export OMP_NUM_THREADS=4...
The above request reflects the configuration of assigning a physical core with its four threads. But you can choose the tasks/threads ratio which better suits your application, and ask for a number of tasks so to obtain a number of logical cores equal to the product of the number of MPI processes * the number of OMP threads per task. For instance, for 4 MPI processes and 16 OMP threads per task, you need 64 logical cores, hence 16 physical cores:
> salloc -N1 --ntasks-per-node=162 --cpus-per-task=4 --gres=gpu:2 -A <account_name> -p <partition_name> --time=01:00:00 # this will assign 16 physical cores with 4 HTs each
> export OMP_NUM_THREADS=16> srun --ntasks-per-node=4 (--cpu-bind=core ) --cpus-per-task=16 -m block:block ./myprogramThe -m flag allows to specify the desired process distribution between nodes/socket/cores (the default is block: cyclic). Please refer to srun manual for more details on the processes distribution and binding. Note that the binding flag is required in order to obtain the correct process binding in case the -m flag is not used.
You can then set the OMP affinity to threads exporting the OMP_PLACES variable.
salloc: Granted job allocation 1175
>  srun ./myprogram
….
> exit
For all the mentioned cases, SLURM automatically exports the environment variables you defined in the source shell, so that if you need to run your program "myprogram" in a controlled environment (i.e. specific library paths or options), you can prepare the environment in the origin shell being sure to find it in the interactive shell (started with both srun and salloc).
A more specific description of the options used by salloc/srun to allocate resources or to give direction to SLURM on how to place tasks and threads on the resources (pinning) is reported later in the “Batch” section, because they are the same of the sbatch command described there.
Batch
As usual on systems using SLURM, you can submit a script script.x using the command:
...